6500 HIGH-WHEEL CULTIVATOR
ASSEMBLY INSTRUCTIONS
R
R
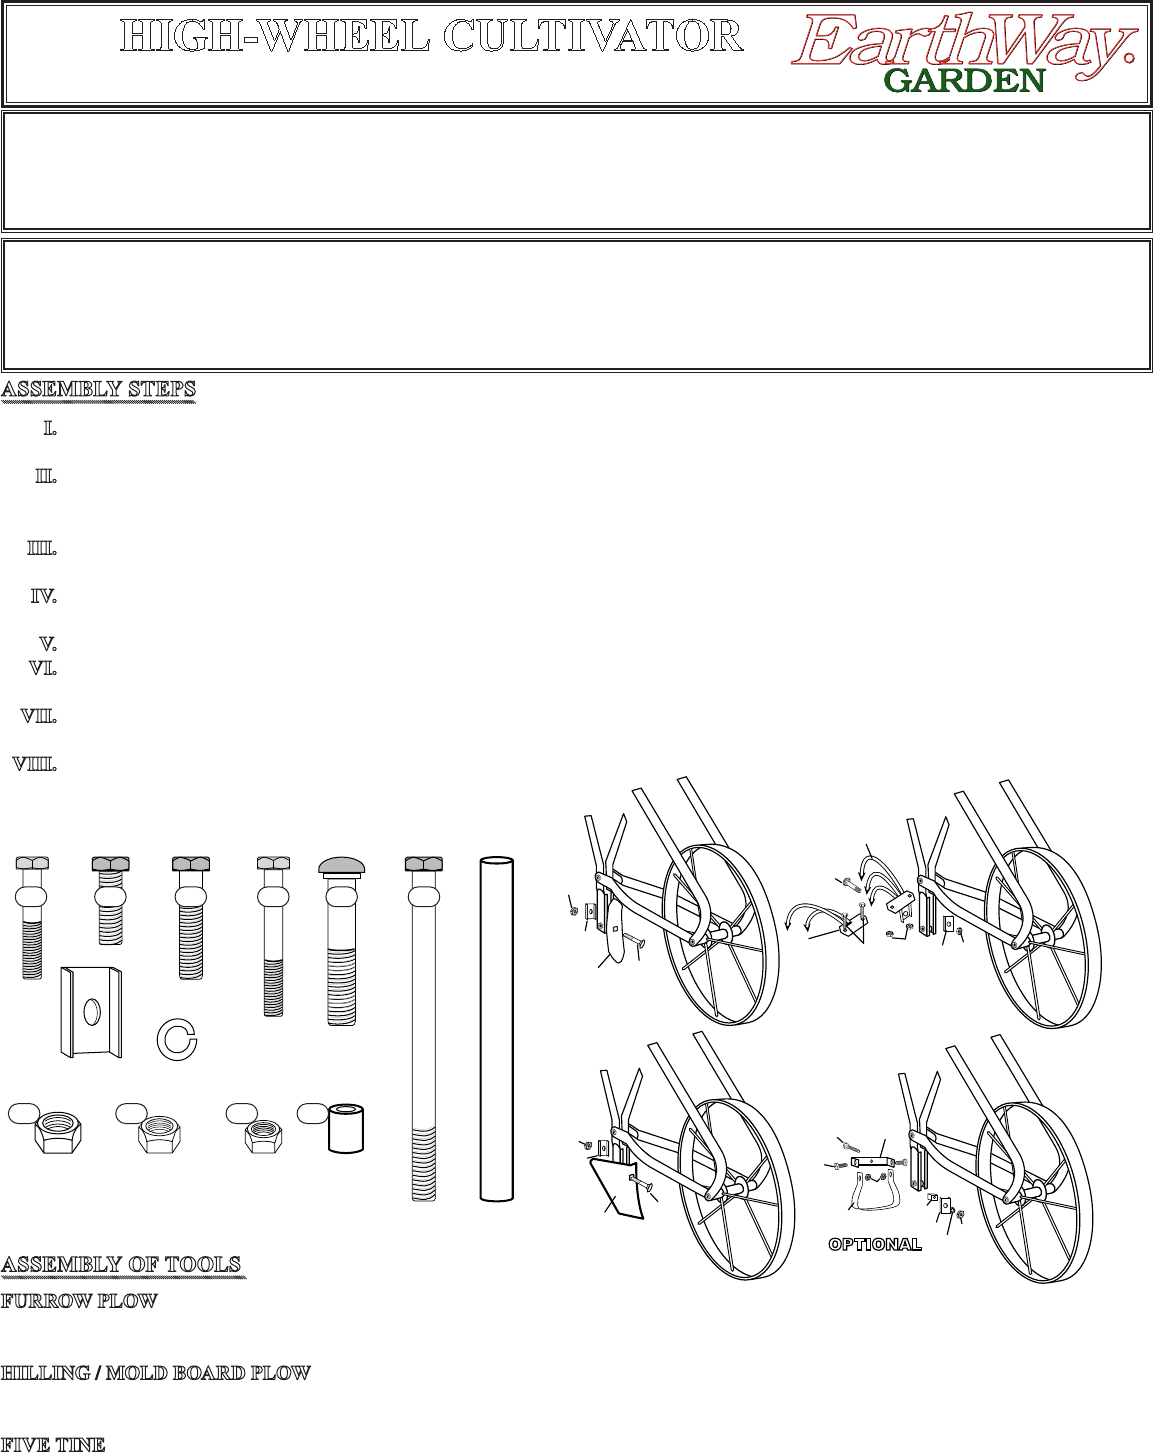
ASSEMBLY STEPS
I. Assemble both (4) Upper and (3) Lower Handles together and secure with (12) 5/16-18 x 1½” hex bolt & (15) 5/16” hex nut - do not
tighten.
II. Assemble (7) Left and (6) Right Tool Supports, by positioning (9) Tool Support Spacer between them at the end that has only one
hole as shown in the exploded view, secure using (11) 5/16-18 x 1¼” hex bolt and (15) hex nut and tighten. Make sure that you have
the Right and Left in the correct position as shown in the exploded view.
III. Connect (2) Frame to the Tool Support Assembly from step 2 using (14) 1/4-20 x 2” hex bolt thru the (2) Frame and then through
both (6 & 7) Tool Supports, then through (2) Frame on the other side and secure with (16) 1/4-20 lock nut, and tighten.
I V. Install (8) Cross Brace on to the Upper Handle and secure with (10) 1/4-20 x 1½” hex bolt and (16) 1/4-20 lock nut to each side,
loosely tighten.
V. Install (5) Axle into (24) Wheel and position between the (2) Frame rails.
VI. Now insert (13) 5/16-18 x 4½” hex bolt through the hole in (3) Lower Handle, (2) Frame, then into (5) Axle & (24) Wheel, then (2)
Frame, (3) Lower Handle and secure with (17) Lock Washer & (15) 5/16-18 hex nut, and tighten.
VII. Now determine a comfortable operation height and then remove (15) 5/16-18 hex nut and select one of the four adjustment holes in
the top of (6 & 7) Tool Supports and secure with (15) 5/16-18 hex nut and tighten.
VIII. Go back and tighten all hardware.
ASSEMBLY OF TOOLS (see above right)
FURROW PLOW
Place Furrow Plow in front of tool support slot. Put carriage bolt (19) through square hole and through slot in tool support. Next put formed
washer (21) over carriage bolt (18) and tool support: fasten with lock nut (18) and tighten fully.
HILLING / MOLD BOARD PLOW
Place Hilling Plow in position shown above. Put carriage bolt (19) through square hole and through slot in tool support. Next put formed
washer (21) over carriage bolt (18) and tool support: fasten with lock nut (18) and tighten fully.
FIVE TINE
Assemble Fine Tine as pictured above. Fasten with two bolts(11) and two (15) hex nuts, tighten fully. Next put carriage bolt (19) through rear
of the Five Tine Assembly and through tool support, fasten with formed washer (21) and lock nut (18).
18
19
21
20
18
20
19
24
25
15
11
15
20
30
28
16
31
27
17
18
19
20
Furrow Plow
#44227
Hilling/Mold Board
Plow #44228
Slicing Hoe #60132
Five Tine
Cultivator
#60141
22
29
Congratulations on the purchase of this new Earthway High-Wheel Cultivator. Please contact us if you have any difculty
with assembly or operation of this product. We can be reached via the telephone at 800-294-0671 or 574-848-7491 Monday -
Friday 9:00am ~ 4:00pm or visit us online at www.earthway.com The 6500 comes with lifetime technical support, email us at
techsupport@earthway.com.
HELPFUL HINTS: READ THE DIRECTIONS BEFORE ASSEMBLY
The 6500 will require approximately 30 minutes to assemble with common hand tools.
5 Remove and identify all loose parts from carton
5 Clean and dry your Cultivator thoroughly after each use.
5 Coat all metal surfaces with a light oil to prevent corrosion
5-2014 Pt. 52126
(6) 32102
5/16”-18
Hex Nut
(1) 36302
3/8”-16
Hex Nut
(3) 32103
1/4”-20
Lock Nut
(1) 31120
1/4-20 x 2”
Bolt
(1) 31116
5/16-18 x 4½”
Bolt
(3) 31111
5/16-18 x 1”
Bolt
(2) 31115
5/16-18 x 1½”
Bolt
(1) 37105
3/8-16 x 2”
Carriage Bolt
(1) 23500
Axle
(1) 23605
Tool Support
Spacer
(2) 31100
1/4-20 x
1½” Bolt
(1) 43033
Formed
Washer
(1) 34104
5/16” Lock
Washer
#10 #11 #12 #14 #19 #13
#18 #15 #16 #9
 (11 pages)
 Manymanuals.com
 Manymanuals.de
 Manymanuals.fr
 Manymanuals.it
 Manymanuals.pl
 Manymanuals.cz
 Manymanuals.es
 Manymanuals-pt.com
Comments to this Manuals